
SetEXIFData
Modify EXIF data in images and movies
or


What SetEXIFData offers is: renaming photos or videos from EXIF dates, get EXIF dates/times from the file name of the photo or video, or from Google JSON-export, increment dates/times and sequence numbers, geotag photos and videos and store the found address, add camera info, add or replace keywords, modify the Finder's Date created or Date modified, save artist, keywords, geo-data and camera data as presets, and much more... or remove EXIF/ IPTC / XMP tags or remove all removable tags.
Tweet
SetEXIFData uses the excellent ExifTool , which you should install first (I have included it in the download for your convenience). SetEXIFData uses exiftool to write most wanted EXIF data into an image or movie container (mov, m4v, mp4) - whatever ExifTool supports.
SetEXIFData uses libraw , to extract a thumbnail for in the Preview-window. libraw should be installed via homebrew : $ brew install libraw.
As long as Apple supports Intel-code via Rosetta on their M-processors, SetEXIFData can als use dcraw (it is also included in the download, for your convenience) to read and display the thumbnail from RAW images. SetEXIFData looks first if finds libraw, if not, it looks for dcraw.
SetEXIFData v10 runs on macOS 10.12 or higher, on 64-bit Intel and M (ARM) Macs.
Lower macOS versions may work, however we don't support these macOS versions.
Note: If setting Finder dates does not work, install/update the Xcode Developer Tools by issuing the following command in Terminal : xcode-select --install.
Note: Open System Preferences. Go to the Security & Privacy tab. Click on the lock and enter your password so you can make changes. Change the setting for 'Allow apps downloaded from' into 'App Store and identified developers'.
The .dmg that you download contains all the instructions to install SetEXIFData.
As of v10.4, SetEXIFData is localised for the mentioned languages, with English as the default language.
If you see wrongly translated words, from English into one of the languages, please let me know.
SetEXIFData uses libraw , to extract a thumbnail for in the Preview-window. libraw should be installed via homebrew : $ brew install libraw.
As long as Apple supports Intel-code via Rosetta on their M-processors, SetEXIFData can als use dcraw (it is also included in the download, for your convenience) to read and display the thumbnail from RAW images. SetEXIFData looks first if finds libraw, if not, it looks for dcraw.
System Requirements
SetEXIFData v10 runs on macOS 10.12 or higher, on 64-bit Intel and M (ARM) Macs.
Lower macOS versions may work, however we don't support these macOS versions.
Note: If setting Finder dates does not work, install/update the Xcode Developer Tools by issuing the following command in Terminal : xcode-select --install.
Note: Open System Preferences. Go to the Security & Privacy tab. Click on the lock and enter your password so you can make changes. Change the setting for 'Allow apps downloaded from' into 'App Store and identified developers'.
Installing SetEXIFData
The .dmg that you download contains all the instructions to install SetEXIFData.
Languages / Talen / Sprachen
/ Idiomas / Lingue / LanguesAs of v10.4, SetEXIFData is localised for the mentioned languages, with English as the default language.
If you see wrongly translated words, from English into one of the languages, please let me know.
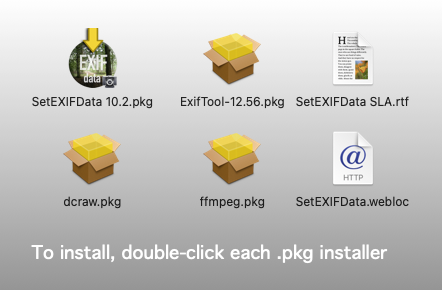
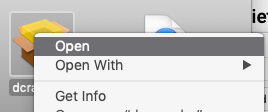
Install dcraw by right-click and then choose 'Open', because it is not signed. The same goes probably for the ffmpeg installer.
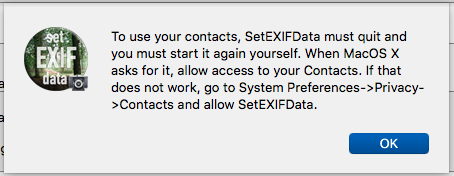
When you start SetEXIFData for the first time, you might be asked to allow 'System Events' and access to your Contacts. Contacts are used to be able to quickly select an address to search for in the Geotag window. Please do allow it:
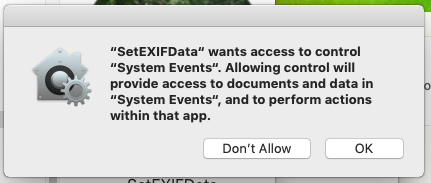
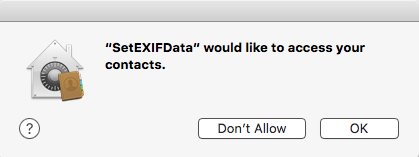
If you do not allow 'System Events', Notifications might not work, and you might not be able to modify images inside system-controlled folders. If you want to allow this later, you have to go into System Preferences > Security & Privacy and add SetEXIFData where needed.
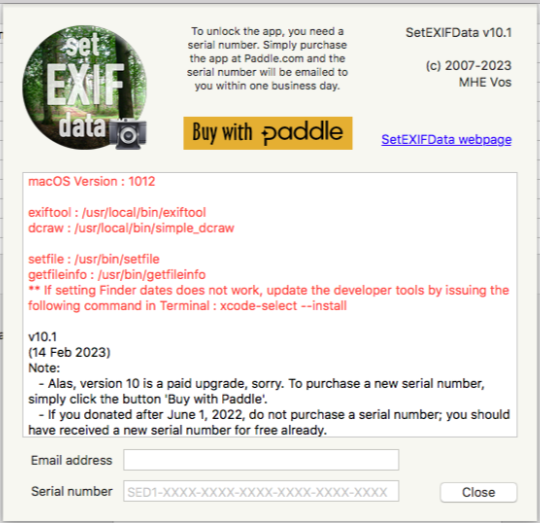
As of v10.0, SetEXIFData is paid software. You can buy a serial number via the button above and below.
If you have donated for SetEXIFData 9 after October 2022, please e-mail me the email address you used + serial number, and I will email you a new serial number for version 10.
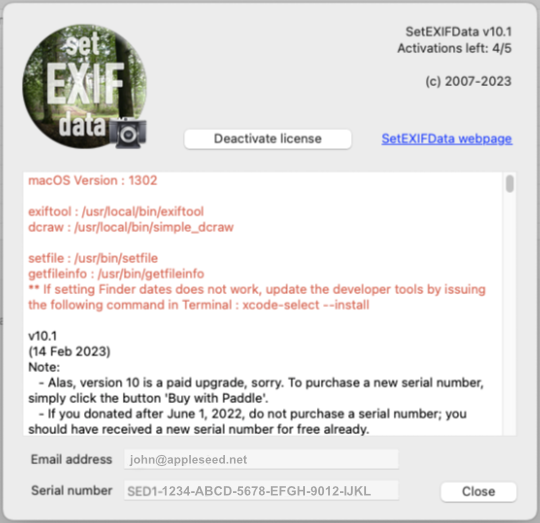
If you have received your serial number, enter the email address you used for the purchase and the serial number in the appropriate fields at the bottom of the 'About…'-window. Simply closing this window will save your registration.
In the 'About...' window you can see the number of registrations left. Initially, you have a maximum of 3 activations, i.e. 3 different Macs. Contact me if you need more.
You can try SetEXIFData as if it were for real.
Registration
As of v10.0, SetEXIFData is paid software. You can buy a serial number via the button above and below.
If you have donated for SetEXIFData 9 after October 2022, please e-mail me the email address you used + serial number, and I will email you a new serial number for version 10.
If you have received your serial number, enter the email address you used for the purchase and the serial number in the appropriate fields at the bottom of the 'About…'-window. Simply closing this window will save your registration.
In the 'About...' window you can see the number of registrations left. Initially, you have a maximum of 3 activations, i.e. 3 different Macs. Contact me if you need more.
Note
You can try SetEXIFData as if it were for real.
'About…'-window when unregistered
'About…'-window when registered
Screenshots
Using macOS Contacts
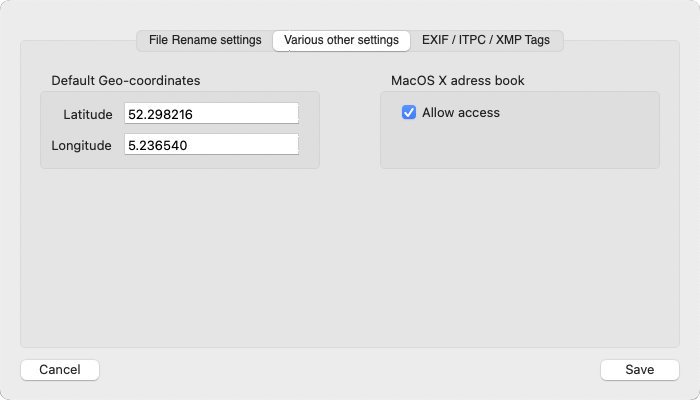
You can use your Mac Contacts to geotag your photos. To allow SetEXIFData to read your contacts, you'll have to allow it when SetEXIFData asks for it. If you do not allow this, the 'Select contact…' pop-up menu wil be disabled.
Your choice is seen in SetEXIFData, because the popup menu either has data or not. This 'yes/no' value is recorded and set as a preference in 'Preferences…':
Your choice is seen in SetEXIFData, because the popup menu either has data or not. This 'yes/no' value is recorded and set as a preference in 'Preferences…':
If you do not allow this, the 'Select contact…' pop-up menu wil be disabled.
Your choice is seen in SetEXIFData, because the popup menu either has data or not. This 'yes/no' value is recorded and set as a preference in 'Preferences…':
Your choice is seen in SetEXIFData, because the popup menu either has data or not. This 'yes/no' value is recorded and set as a preference in 'Preferences…':
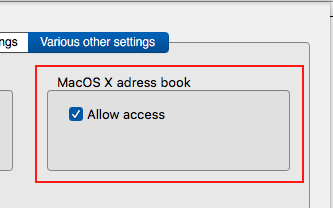
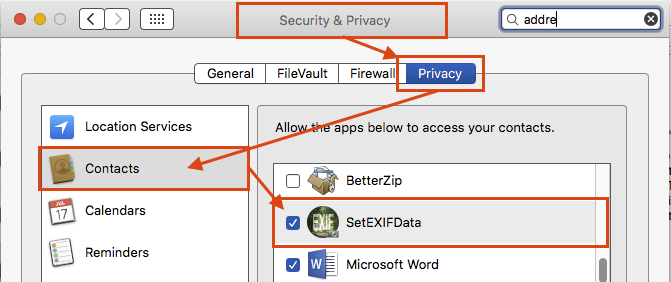
If this setting is unchecked, SetEXIFData will not try to access your contacts. If you later decide to allow access to your contacts, you might get the following message:
If SetEXIFData keeps asking to allow to access your contacts each time you start the app, despite you clicking 'Ok' every time, you can change the setting manually in System Preferences -> Security & Privacy -> Privacy -> Contacts -> SetEXIFData.
Note: when you allow this, only addresses with a street address and a first- or last-name will be listed.
Note on privacy: SetEXIFData does nothing with your contacts, but creating a pop-up menu for easy geotagging.
Note on privacy: SetEXIFData does nothing with your contacts, but creating a pop-up menu for easy geotagging.

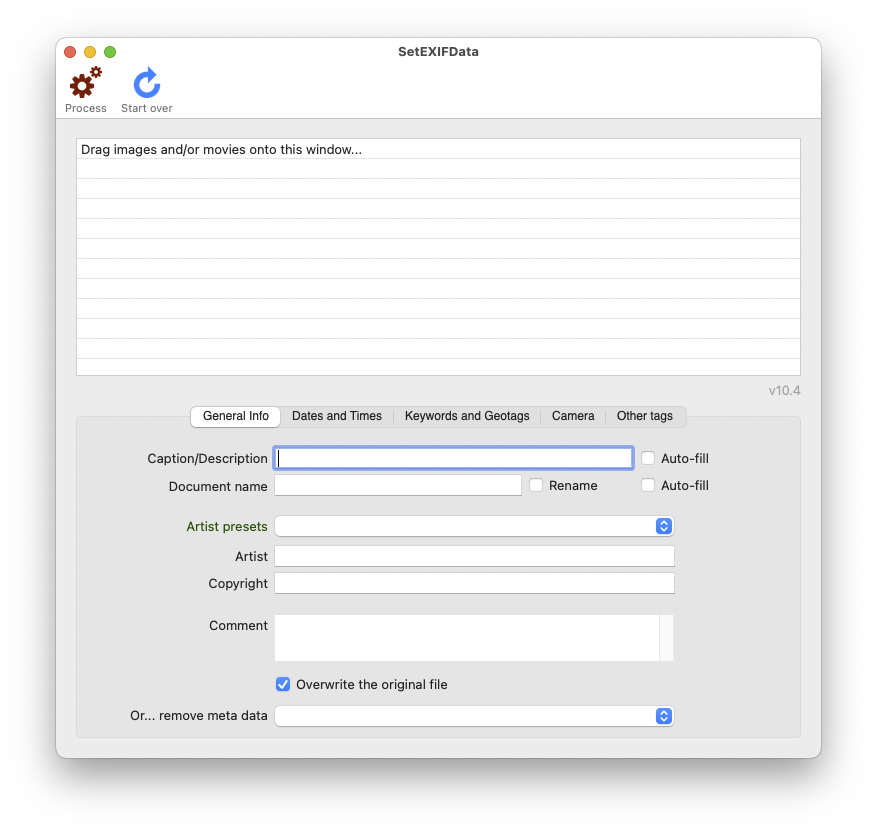
The Process button processes all the files in the list.
Drag a bunch of images onto the SetEXIFData window, fill all relevant EXIF data into the screen fields and then click on Process to 'process' the image files: this will add/overwrite EXIF data, set file dates, etc.. The list window will be cleared when processing is done.
Drag a bunch of images onto the SetEXIFData window, fill all relevant EXIF data into the screen fields and then click on Process to 'process' the image files: this will add/overwrite EXIF data, set file dates, etc.. The list window will be cleared when processing is done.

The Start over button clears all fields, except the Artist and Copyright fields.
Simply drag a bunch of images and/or movies onto SetEXIFData's window:
You can select and delete multiple rows from the list. Use SHIFT and/or COMMAND keys to select rows, hit BACKSPACE or DEL to remove the selected lines from the list.
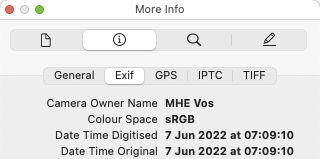
When you double click on a file path, a new window opens with a preview of the image and all current EXIF, XMP, etc. data which can be read, is listed.
You can have multiple preview windows of different photos open at the same time. To open multiple previews at once, simply select multiple lines and hit COMMAND-O.
You can have multiple preview windows of different photos open at the same time. To open multiple previews at once, simply select multiple lines and hit COMMAND-O.
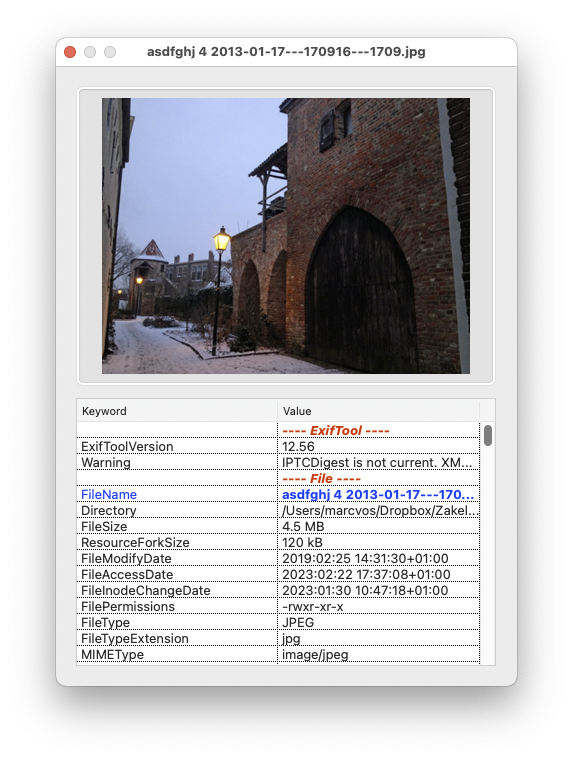
When you double-click on a row in the EXIF-list inside a preview window, the value of the right column is copied to the clipboard.
Type something to describe the photo.
With the Auto fill check box set, SetEXIFData automatically updates the description properties of all listed photos with their respective actual file names.
This modifies the following META-data : Caption-Abstract, Description, ImageDescription, Title, XPSubject and XPTitle.
With the Auto fill check box set, SetEXIFData automatically updates the description properties of all listed photos with their respective actual file names.
This modifies the following META-data : Caption-Abstract, Description, ImageDescription, Title, XPSubject and XPTitle.
Type the original name of the document in here. Then you can change the name of the document in the Finder and still see what its original name was.
With the Auto fill check box set, SetEXIFData automatically updates the DocumentName property of all listed photos with their respective actual file names, without their file extension.
This modifies the following META-data : DocumentName.
With the Rename check box set, SetEXIFData will also actually rename all photos in the list. You can write the EXIF date, time and an image number in the new file name.
With the Auto fill check box set, SetEXIFData automatically updates the DocumentName property of all listed photos with their respective actual file names, without their file extension.
This modifies the following META-data : DocumentName.
Rename photos afterwards
With the Rename check box set, SetEXIFData will also actually rename all photos in the list. You can write the EXIF date, time and an image number in the new file name.

The renaming of photos takes place after all files have received the new EXIF data. Which means that if you have specified a new Date/Time with or without an interval, that calculated date will be used for the placeholders.
To automatically rename a file or files, do the following:
You can use the following placeholders:
To automatically rename a file or files, do the following:
Enter a new name in the 'Document name' field.
You can use the following placeholders:
- %d = will be replaced by a date in the form YYYYMMDD.
- %-d = will be replaced by a date in the form YYYY-MM-DD.
- %.d = will be replaced by a date in the form YYYY.MM.DD.
- %s = will be replaced by a time in the form HHMMSS.
- %-s = will be replaced by a time in the form HH-MM-SS (because a ':' cannot be used in a file name).
- %.s = will be replaced by a time in the form HH.MM.SS.
- %t = will be replaced by a time in the form HHMM.
- %-t = will be replaced by a time in the form HH-MM (because a ':' cannot be used in a file name).
- %.t = will be replaced by a time in the form HH.MM.
- %x = will be replaced by a number in the form XXXXXX (depends on the preference-setting).
- %n = will be replaced by the current file name, without its file extension.
- %-d = will be replaced by a date in the form YYYY-MM-DD.
Check the preferences window for 'Rename'-settings:
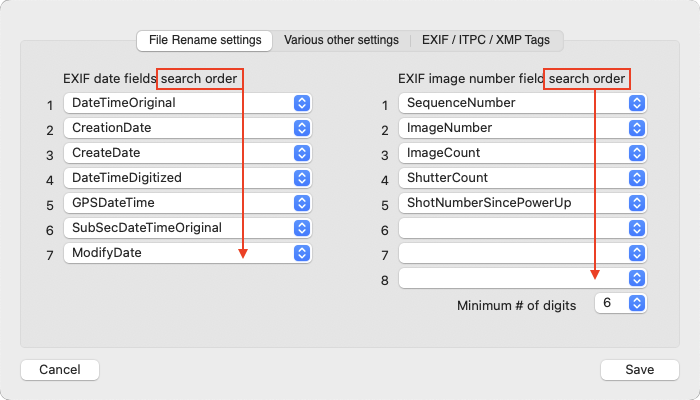
Date/time EXIF fields
The first date/time found in the default search order - 'DateTimeOriginal', 'CreateDate', 'DateTimeDigitized', 'GPSDateTime', 'SubSecDateTimeOriginal', 'ModifyDate' or 'FileModifyDate', will be used for the date and time placeholders. You can change the search order under 'Preferences...'.
Image Number EXIF fields
The placeholder %x will be replaced with the first number found in the default search order: 'SequenceNumber', 'ImageNumber', 'ImageCount', 'ShutterCount', 'ShotNumberSincePowerUp', 'SubSecTime', 'SubSecTimeOriginal' or 'SubSecTimeDigitized'.
The latter three will also be used if 'SubSecDateTimeOriginal' is present in the Date/Time search order list under 'Preferences...', where you can change the search order.
The number will, by default, be formatted as 3 digits long: for example, the number 1 will be formatted as 001 and 1000 will be left as 1000. You change the length of the number under 'Preferences...': from 3 to 6 digits long.
Rename-example:
- Example pattern
- img-%x-burst
- (you can add your own text in front, in between or at the end)
- (you can add your own text in front, in between or at the end)
- Minimum # of digits set to 6:
- -> img-065036-burst.jpg
- -> img-065037-burst.jpg
- -> img-065038-burst.jpg
- -> img-065037-burst.jpg
- Minimum # of digits set to 5:
- -> img-65036-burst.jpg
- -> img-65037-burst.jpg
- -> img-65038-burst.jpg
- -> img-65037-burst.jpg
- Minimum # of digits set to 4 or less:
- -> img-65036-burst.jpg
- -> img-65037-burst.jpg
- -> img-65038-burst.jpg
- (only lower numbers will be prepended with zeros)
- -> img-65037-burst.jpg
Tip: If you only want to rename files without adding any EXIF data first, leave everything empty, add your list of photos and use a 'DocumentName' like %d_%s.%x-%n:
Tip: Some users are using SetEXIFData to batch-rename their audio files or set the correct Finder-dates of audio-files using EXIF-data from, for example, WAV-files. If you have other audio file types, simply try if it will work.
- Tick the checkbox 'Rename'. The checkbox 'Auto fill' is automatically checked, too. 'Auto fill' stores the current file name in the EXIF 'DocumentName' property. If you uncheck 'Auto fill' with 'Rename' checked, the 'DocumentName' property will not be modified.
- If a date or time placeholder is used and no date is found in the EXIF data, the file will not be renamed.
- If a new file name is already in use in that folder, a space and a sequence number is added to the file name, which will be incremented with each duplicate file name. Say a file is renamed to '20150401_151112.jpg' and the next photo would get the same name based on the EXIF data, then the name will become: '20150401_151112 1.jpg' and the next '20150401_151112 2.jpg', etc.
- If renaming a file is bounced by MacOS X, you will get a notification via Growl and via a dialog window with the reason why.
Tip: Some users are using SetEXIFData to batch-rename their audio files or set the correct Finder-dates of audio-files using EXIF-data from, for example, WAV-files. If you have other audio file types, simply try if it will work.
Type the name of the artist ;-)
This modifies the following META-data : Artist, Creator, Author, By-Line and OwnerName.
This modifies the following META-data : Artist, Creator, Author, By-Line and OwnerName.
Type your copyright text. Symbols are replaced :
- © : Copyright (c)
- ™ : Trademark (tm)
- ® : Registered Trademark (r)
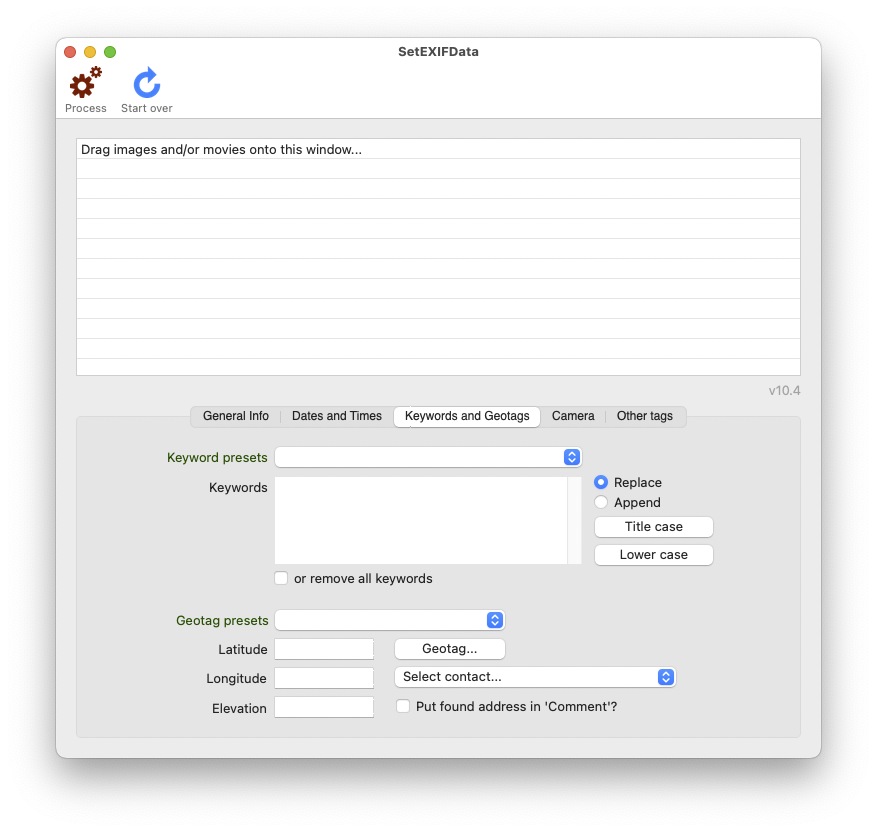
Type each keyword on a new line or separate them by a comma.
Keywords will be sorted in alphabetical order before processing takes place. You can sort the keywords interactively by control-clicking (or click with a right mouse button) inside the keywords field. You have to watch closely, because it happens in a flash.
With the TitleCase checkbox set, all keywords are automatically title-cased when you leave the Keyword-field. To preserve pre-v3 behaviour, where this was done by default, the checkbox is on by default.
With the or remove all keywords checkbox set, all entered keywords are removed from the Keyword-field, both the Replace and Append-buttons are unchecked and when you process the list, all keywords are removed from all listed photos.
This modifies the following META-data : keywords and subject.
Check this setting when you want the modifications done on the original file.
If you uncheck this setting, each file is first copied to [filename.ext]_original before the modifications are made.
If you uncheck this setting, each file is first copied to [filename.ext]_original before the modifications are made.

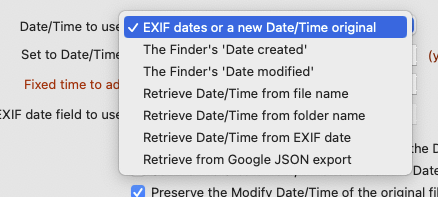
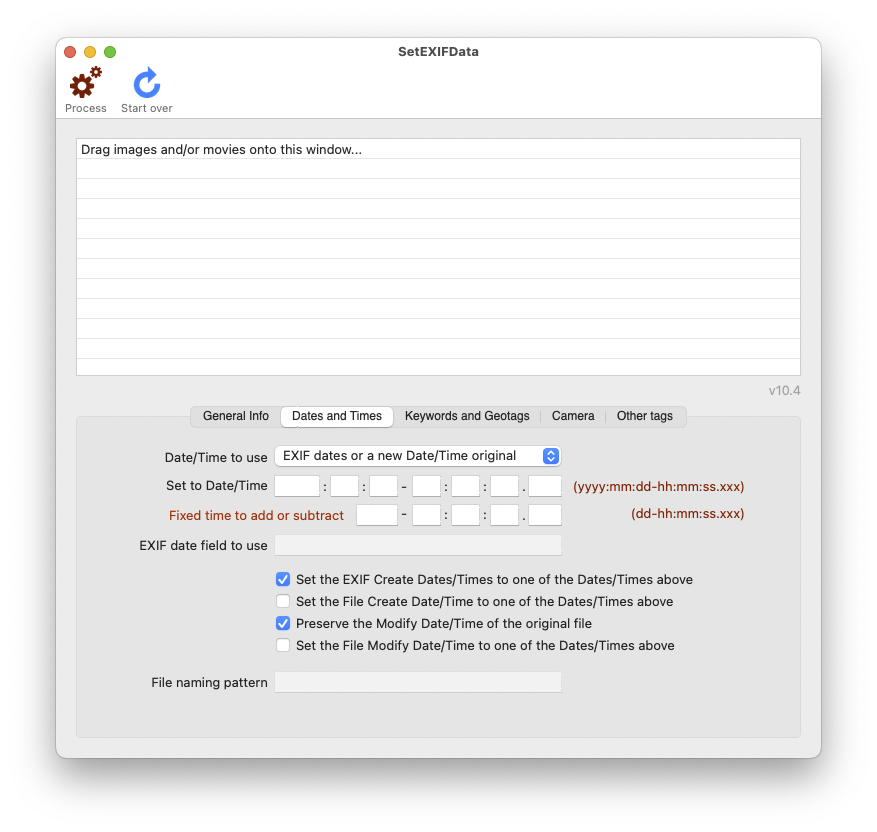
Choose which Date/Time you want to use for the Date/Time original tag. The first option is the default setting and uses the Date/Time original entry fields, described next. Options 4 and 5 requires the entry field File name pattern to be used, which defines what to retrieve from the file's name. See further below for a detailed explanation.
With either option 2 or 3 selected, all other date/time entry fields and checkboxes will be disabled, except the relevant ones.
Option 7 requires a JSON file with the exact same name as the image file + extra extension .json, for example: my-image.jpg and my-image.jpg.json.
Options 8 and 9 block further entry of data, and ignore already entered data, except 'Replace original in place'.
See the sections below for detailed descriptions.
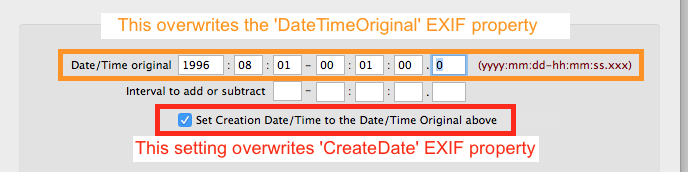
The date and time when the artwork was made.
If you want to use this, you should fill it out completely - parts of a date are not possible and will be set to 0 (zero).
This modifies the following META-data : datetimeoriginal. No other dates that may be present in the EXIF data will be modified, depending on which checkboxes you ticked (see below).
You can add or subtract a fixed amount of time to or from a batch of photo's or movies. This is especially handy when you forgot to set daylight savings time or went from one time zone to another. If you subtract, make sure the minus sign only occurs once, at the leftmost entry.
This feature is enabled when you leave the Date/Time Original empty.
Here's an example where we shall subtract one hour and thirty minutes from each image or movie:
This feature is enabled when you leave the Date/Time Original empty.
Here's an example where we shall subtract one hour and thirty minutes from each image or movie:

The interval feature is enabled when you enter a Date/Time Original.
The text 'Fixed time to add or subtract' changes to 'Interval to add or subtract'.
The interval is a number of days, hours, minutes and/or seconds you want to add to the 'Date/Time Original' for each next image or movie. The first one gets the entered Date/Time Original and the next one gets the Interval added or subtracted, and so forth.
To use the interval, you need a starting point. SetEXIFData is meant for batch processing and thus does not read data from a photo to modify. Instead you, as a user, provide the data as you want it to be and that is what SetEXIFData then writes to the files.
So you need to enter a date/time for the first picture, then you can add or subtract days or hours for the second picture and so on. If you subtract, make sure the minus sign only occurs once, at the leftmost entry.
Here's an example where we shall subtract one hour:

Here, the first image is set to the date + time:
The next image gets 1 hour subtracted from the date:
The next image would have 06:09:10 and so forth.
You can also add a sequence number to a photo, or add burst-seconds. Whatever you like it to be!
To do this, first enter a starting number in the last entry field of 'Date/Time original', usually 1. This is what the '.xxx' represent in the format-example on the right. Then, enter a number to add, usually 1, in the Interval-section:

If you only want to add a sequence number, you do not need to enter dates and/or times.
This modifies the following META-data : SequenceNumber, ImageCount, ImageNumber, SubSecTime, SubSecTimeOriginal. When 'Set Creation Date/Time ...' is checked, also 'SubSecTimeDigitized' will be set.
This modifies the following META-data : SequenceNumber, ImageCount, ImageNumber, SubSecTime, SubSecTimeOriginal. When 'Set Creation Date/Time ...' is checked, also 'SubSecTimeDigitized' will be set.

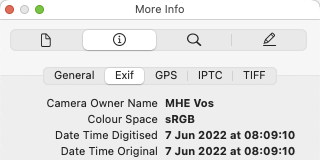
When you choose 'Retrieve Date/Time from EXIF date' from the popup-menu, you can use an existing date/time property which exists within an image or movie.
SetEXIFData will use the date/time from this property and copy it into the other date/time properties, as with the other options.
If the property is not present in a file, that file is left alone and skipped.
This modifies the following META-data : datetimeoriginal. No other dates that may be present in the EXIF data will be modified, depending on which checkboxes you ticked (see below).
Check this setting when you want the Creation Date to have the same date as the Date/Time Original you entered above. This is handy for photos you scanned off a 35mm film or from the print. Only you know when it was taken, so the original date is the same as the creation date. This setting does not modify the file's creation date in the Finder - which is not an EXIF date.
This modifies the following META-data : createdate, timecreated, datecreated, modifydate and additionally in case of a movie-file trackcreatedate, trackmodifydate, mediacreatedate, mediamodifydate.
This modifies the following META-data : createdate, timecreated, datecreated, modifydate and additionally in case of a movie-file trackcreatedate, trackmodifydate, mediacreatedate, mediamodifydate.
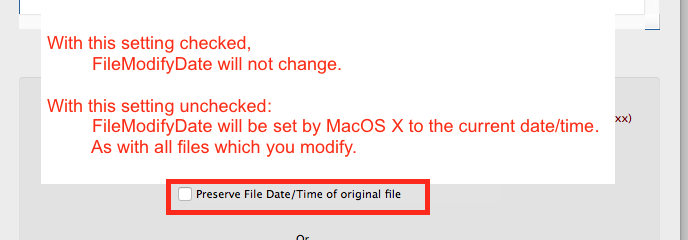
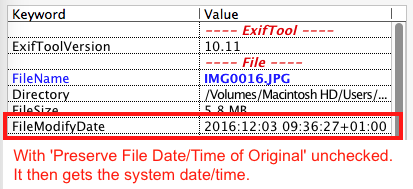
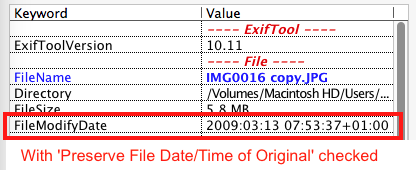
Check this setting when you want to retain the dates in the Finder - which are not EXIF dates. The new file will have the same Finder dates as the original file. If you uncheck this setting, the modified file will get today's date as creation and modification date in the Finder.
Original data of a scanned image before processing:
After processing with Preserve File Date/Time of original file unchecked:
After processing with Preserve File Date/Time of original file checked:
Result in Finder:

Note: 'Preserve File Date/Time of original file' and 'Set the File Modify Date/Time to the Date/Time Original' are mutually exclusive.
These settings use the DateTimeOriginal EXIF date to modify the Finder's attributes.


Note: 'Preserve File Date/Time of original file' and 'Set the File Modify Date/Time to the Date/Time Original' are mutually exclusive.
Note : The Finder's Date Created and Date Modified, when checked, will not be touched when images or EXIF have dates from 1969 or before.
Note : The Finder's Date Created and Date Modified, when checked, will not be touched when images or EXIF have dates from 1969 or before.
To use the date/time from a file name, for example from files named 'IMG_000045 15-01-1966.jpg' or '20160428_175402.jpg' do this:
Select the option 'Retrieve Date/Time from file name' from the pop-up menu 'Date to use on the 'Dates and Times'-tab.
A default pattern is inserted for you in the 'File name pattern' field. You can modify it as needed and use the following placeholders to look for a date and time in the file name:
Select the option 'Retrieve Date/Time from file name' from the pop-up menu 'Date to use on the 'Dates and Times'-tab.
A default pattern is inserted for you in the 'File name pattern' field. You can modify it as needed and use the following placeholders to look for a date and time in the file name:
- xx = the number of characters of the file name to skip before starting to look for a date and time. This is optional, but needed when you have numbers in the file name before the date and time.
- %Y = will look for max. 4 digits and use it as a year.
- %y = will look for max. 2 digits and use it as a year.
- %m = will look for 2 digits and use it as a month.
- %d = will look for 2 digits and use it as a day of the month.
- %h = optional; will look for 2 digits and use it as hours. Defaults to 0 if not present.
- %i = optional; will look for 2 digits and use it as miniutes. Defaults to 0 if not present.
- %s = optional; will look for 2 digits and use it as seconds. Defaults to 0 if not present.
- %x = optional; will look for max. 3 digits and use it as subsecond or sequence number. Defaults to 0 if not present.
The pattern is processed from left to right.
SetEXIFData does not know what a year or month or... is; it just reads digits up to the maximum for the current attribute or the first non-digit.
The pattern '%Y%m%d%h%i%s%x' will start looking for the date/time and a sequence number from position 1.
The pattern '7%Y%m%d%h%i%s' will start looking for the date/time from position 7.
The pattern '%Y-%m-%d at %h:%i:%s.%x' will start looking for the date/time from position 1 and will give the same result as the first example, because anything between the patterns is ignored.
You can use the day and time fields from the 'Date/Time original' and from the 'Add interval' entry-fields, to add a default time and/or sequence number to the found date, if no time or sequence number is present for the placeholder in the file name.
For example, the minimum placeholder that is accepted is %Y%m. This will extract the first 6 digits it encounters and will use the day, hour, minute, second and sequence number from the 'Date/Time original' for the missing placeholders. When no data is entered in those fields, the default day will be 1 and the default hour will be 12.
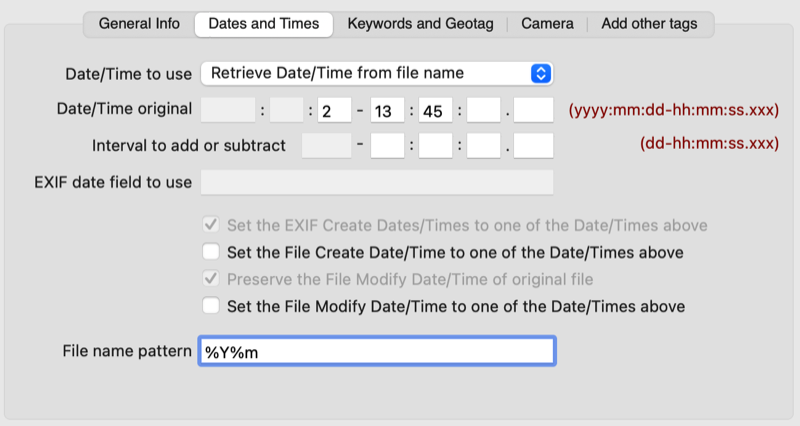
In the above example, a missing day (%d) will be substituted with 2, a missing hour (%h) with 13, a missing minute (%m) with 45, a missing second (%s) and a missing sequence number (%x) will be set to 0.
As long as photos with the same date in the name are being processed one after another, the specified interval will be added. If no interval is specified, all photos will get the same time and sequence number.
When a new date is read from a file name, the process starts over, beginning with the time and/or sequence number in the Date/Time original entry fields.
** Important note ** : the placeholders simply take the numbers they encounter and interpret them as what the placeholder requires. The spacing of the pattern is irrelevant, except for %Y. To accurately retrieve dates and times from a file's name, the given pattern must match the date/time pattern in the selected file names, qua order of digits. %y%m%d will only interpret dates in file names like YYMMDD or YY/MM/DD or YY-MM-DD. %Y will look for a 4-digit year, or less if it encounters a non-digit: YYYYMM or YY-MM. For formats like MM/DD/YY or DD-MM-YYYY, etc., you would use the %m%d%y or %d%m%Y patterns respectively.
When a 2-digit year is read and its value is less than 40, 2000 is added, or when greater or equal to 40 and less than 100, 1900 is added, to make it a 4-digit date for use with EXIF and Finder dates.
Examples:
'2017-09-01 13u22m10s 001.jpg' => %Y%m%d%h%m%s%x => 20170901132210.001
'2017-09-01 13u22m10s 001.jpg' => %m%d%Y%h%m%s%x => 09012017132210.001 (wrong due to a pattern mismatch)
'2017090_1132210 nr. 001.jpg' => %Y%m%d%h%m%s%x => 21070901132210.001
'Cool photo taken on 01-09-2017.jpg' => %y%m%d%h%m%s%x => 2001092017000000 (wrong due to a pattern mismatch)
'Cool photo taken on 01-09-2017.jpg' => %d%m%Y => 20170901000000
'Cool photo taken on 01-09-2017.jpg' => %m%d%y => 20170109000000
%Y and %y behavior:
%Y%m%d: 80-09-12 -> %Y will read 80 and add 1900 = 1980
%y%m%d: 80-09-12 -> %y will read 80 and add 1900 = 1980
%Y%m%d: 1980-09-12 -> %Y will read 1980
%y%m%d: 1980-09-12 -> %y will read 19 and add 2000 = 2019 and because the next two digits are treated as the month, 80, a completely wrong date will be generated.
%Y%m%d: 800912 -> %Y will read 8009 and because the month will be 12 and the day therefore 0, it will generate a completely wrong date.
%y%m%d: 800912 -> %y will read 80 and add 1900 = 1980
%Y%m%d: 19800912 -> %Y will read 1980
%y%m%d: 19800912 -> %y will read 19 and add 2000 = 2019 and because the next two digits are treated as the month, 80, a completely wrong date will be generated.
Note : The Finder's Date Created and Date Modified, when checked, will not be touched when images or EXIF have dates from 1969 or before.
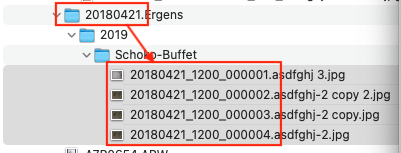
To use the date/time from a folder name, for example from a folder name somewhere inside a path like /Users/yourname/Pictures/Family/1960-02-23.Picknick/On the grass.jpg, do this:
Select the option 'Retrieve Date/Time from folder name' from the pop-up menu 'Date to use on the 'Dates and Times'-tab.
A default pattern is inserted for you in the 'File name pattern' field. You can modify it as needed and use the following placeholders to look for a date and time in a folder name:
- xx = the number of characters of the file name to skip before starting to look for a date and time. This is optional, but needed when you have numbers in the file name before the date and time.
- %Y or %y = will look for 4 digits and use it as a year.
- %m = will look for 2 digits and use it as a month.
- %d = will look for 2 digits and use it as a day of the month.
- %h = optional; will look for 2 digits and use it as hours. Defaults to 0 if not present.
- %i = optional; will look for 2 digits and use it as miniutes. Defaults to 0 if not present.
- %s = optional; will look for 2 digits and use it as seconds. Defaults to 0 if not present.
- %x = optional; will look for max. 3 digits and use it as subsecond or sequence number. Defaults to 0 if not present.
The pattern is processed from left to right.
SetEXIFData does not know what a year or month or... is; it just reads digits up to the maximum for the current attribute or the first non-digit.
However, to not put a silly date inside the image's EXIF dates, some checks are done on year, month, day, hour, minute and second. If the check does not pass, the EXIF dates of the image will not be set.
The pattern '%Y%m%d%h%i%s%x' will start looking for the date/time and a sequence number from position 1.
The pattern '7%Y%m%d%h%i%s' will start looking for the date/time from position 7.
The pattern '%Y-%m-%d at %h:%i:%s.%x' will start looking for the date/time from position 1 and will give the same result as the first example, because anything between the patterns is ignored.
If no day, time or sequence number is present for the placeholder in the folder name, you can use the day and time fields from the 'Date/Time original' and from the 'Add interval' entry-fields, to add a default time and/or sequence number to the found date.
For example, the minimum placeholder that is accepted is %Y%m. This will extract the first 6 digits it encounters and will use the day, hour, minute, second and sequence number from the 'Date/Time original' for the missing placeholders.
SetEXIFData does not know what a year or month or... is; it just reads digits up to the maximum for the current attribute or the first non-digit.
However, to not put a silly date inside the image's EXIF dates, some checks are done on year, month, day, hour, minute and second. If the check does not pass, the EXIF dates of the image will not be set.
- A valid year : between 1800 and 3000.
- A valid month: between 01 and 12
- A valid day: between 00 and 31 (no month-test is done; if 0, enter a day number in 'Date/Time original' section)
- A valid hour: between 00 and 23 (if 0, you can enter an hour in 'Date/Time original' section, otherwise hour remains 00)
- A valid minute: between 00 and 59 (if 0, you can enter an minute in 'Date/Time original' section, otherwise minute remains 00)
- A valid second: between 00 and 59 (if 0, you can enter an second in 'Date/Time original' section, otherwise second remains 00)
The pattern '%Y%m%d%h%i%s%x' will start looking for the date/time and a sequence number from position 1.
The pattern '7%Y%m%d%h%i%s' will start looking for the date/time from position 7.
The pattern '%Y-%m-%d at %h:%i:%s.%x' will start looking for the date/time from position 1 and will give the same result as the first example, because anything between the patterns is ignored.
If no day, time or sequence number is present for the placeholder in the folder name, you can use the day and time fields from the 'Date/Time original' and from the 'Add interval' entry-fields, to add a default time and/or sequence number to the found date.
For example, the minimum placeholder that is accepted is %Y%m. This will extract the first 6 digits it encounters and will use the day, hour, minute, second and sequence number from the 'Date/Time original' for the missing placeholders.
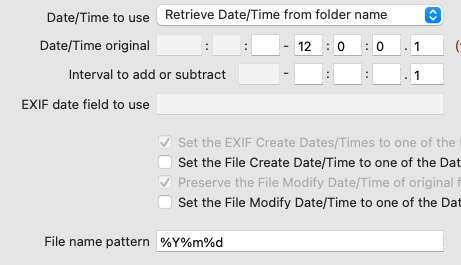
In the above example, a missing hour (%h) will be replaced with 12, a missing minute (%m) with 0, a missing second (%s) with 0 and %x will be initially set to 1.
As long as images or movies with the same folder are being processed one after another, the specified interval will be added. If no interval is specified, all files will get the same time and sequence number.
When a new date is read from another folder name, the process starts over, beginning with the time and/or sequence number in the 'Date/Time original' entry fields.
** Important note ** : the placeholders simply take the numbers they encounter and interpret them as what the placeholder requires. The spacing of the pattern is irrelevant. To accurately retrieve dates and times from a folder's name, the given pattern must match the date/time pattern, qua order of digits. %y%m%d will only interpret dates in folder names like YYYYMMDD or YYYY/MM/DD or YYYY-MM-DD. For formats like MM/DD/YYYY or DD-MM-YYYY, etc., you would use the %m%d%y or %d%m%Y pattern.
Result from the above settings:
Note : The Finder's Date Created and Date Modified, when checked, will not be touched when folders or EXIF have dates from 1969 or before.
If you drag images exported from Google onto the window, the JSON file should exist in the same folder, as it was named by Google: [image-name].jpg.json. SetEXIFData will use the fields 'description', 'photoTakenTime' and 'geoDataExif' from the JSON file.
Such a JSON file looks like this:
Such a JSON file looks like this:
{
  "title": "panoramio-79219278.jpg",
  "description": "Baldeneysee",
  "imageViews": "13",
  "creationTime": {
    "timestamp": "1535688389",
    "formatted": "31 aug. 2018 04:06:29 UTC"
  },
  "photoTakenTime": {
    "timestamp": "1346515698",
    "formatted": "1 sep. 2012 16:08:18 UTC"
  },
  "geoData": {
    "latitude": 51.405667,
    "longitude": 7.018332999999999,
    "altitude": 0.0,
    "latitudeSpan": 0.0,
    "longitudeSpan": 0.0
  },
  "geoDataExif": {
    "latitude": 51.4056667,
    "longitude": 7.0183333,
    "altitude": 0.0,
    "latitudeSpan": 0.0,
    "longitudeSpan": 0.0
  },
  "url": "https://lh3.googleusercontent.com/cAZ_rC0KD7FoJw-z_uAHQU5sGe4xhKATmR7Gm-Tud8xfNPbLUdbV3AGbbmass7hnTkevWtbU08FUgQYhUV-DKR0Ds8Fi0HoAswiJrXM",
  "photoLastModifiedTime": {
    "timestamp": "1643670493",
    "formatted": "31 jan. 2022 23:08:13 UTC"
  }
}
Click the Geotag button to call a window which loads Google Maps:
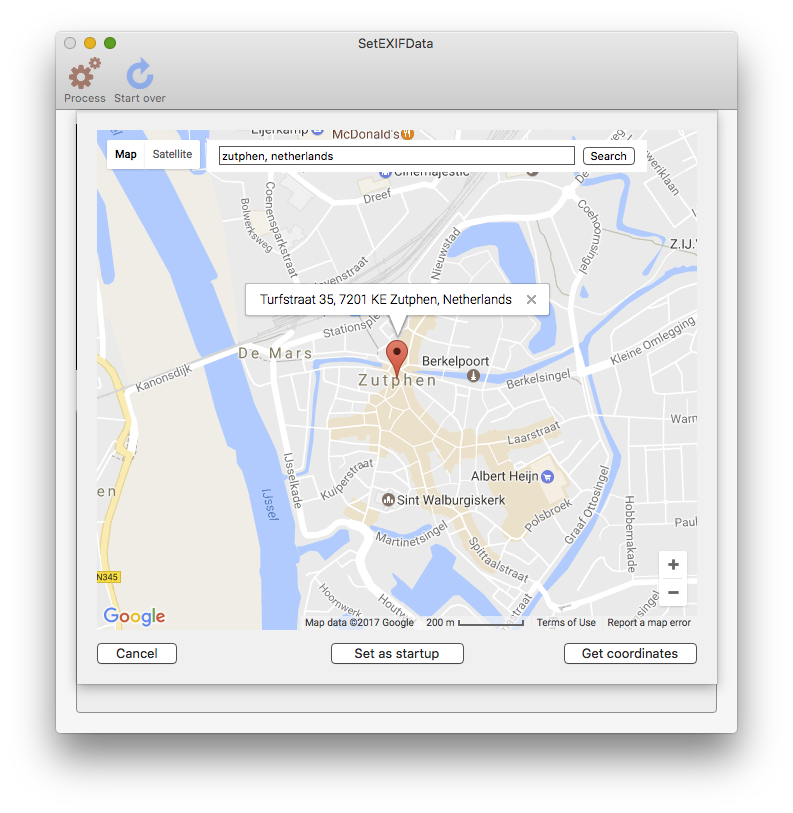
If you allowed SetEXIFData to read you contacts, you can first select an address via the 'Select contacts…' pop-up menu. When you then click 'Geotag', the map wil try to load the selected address, otherwise it will try to position at the entered Latitude and Longitude, and as default, it will try to position the map at the stored 'Set as startup' coordinates.
'Set as startup' button
Click this button if you want the coordinates you picked to be the startup coordinates when the Google Maps window loads.
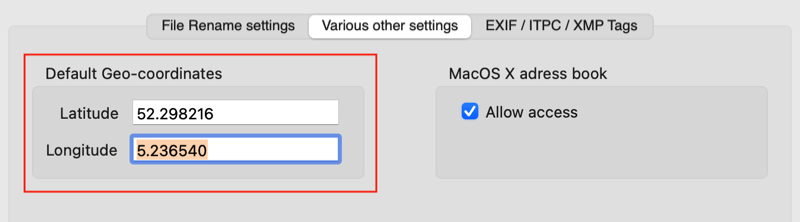
You can see, or manually change, these coordinates under 'Preferences...'
'Set as startup' button
Click this button if you want the coordinates you picked to be the startup coordinates when the Google Maps window loads.
You can see, or manually change, these coordinates under 'Preferences...'
'Get coordinates' button
Click this button to pass the coordinates you chose, back to the Latitude, Longitude and Altitude fields. Whether you selected an address via the 'Select contacts…' pop-up menu or not, it is reset to 'Select contacts…'.
This modifies the following META-data : GPSLatitude, GPSLatitudeRef, GPSLongitude, GPSLongitudeRef, GPSAltitude and GPSAltitudeRef.
Check this setting when you want the address data – found by Google Maps while using the Geotagging-feature – stored in the Comment field.
Note that this setting overwrites the contents of the Comment field.
This parameter is checked automatically when you select an address from the 'Select contacts…' pop-up menu.
Note that this setting overwrites the contents of the Comment field.
This parameter is checked automatically when you select an address from the 'Select contacts…' pop-up menu.
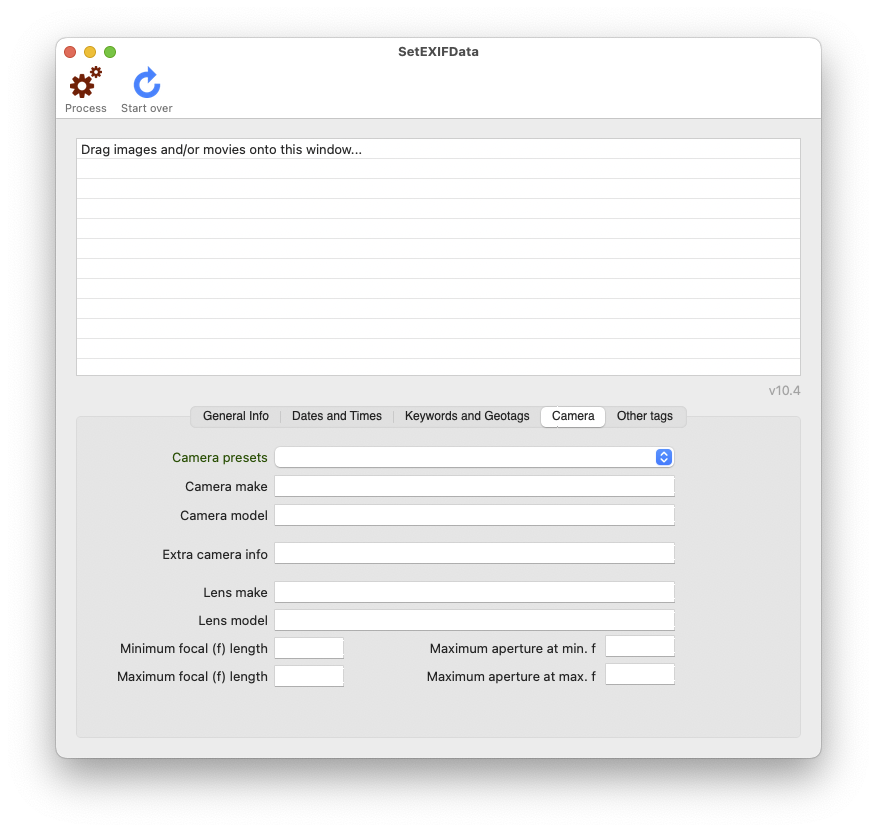
Make and Model speak for themselves.
In Extra camera info, you can write things like '10 megapixel, 3x optical zoom'.
This modifies the following META-data : Make, Model, ExifCameraInfo and CameraLabel.
CameraLabel is filled with 'Make, Model'
LensMake and LensModel speak for themselves.
Min. focal (f) length and Max. focal (f) length expect a (decimal) number like 7.5, 14, 28, 35, 50, etc.. Do not add the text 'mm'.
Max. aperture at min. f and Max. aperture at max. f expect a (decimal) number, like 2.8, 4.5, 5.6, 8, etc.. Do not prefix with 'f' or 'f/'.
This modifies the following META-data : LensMake, LensModel, LensInfo and Lens.
Lens is filled with 'LensMake, LensModel'
LensInfo is combined from the two focal and the two aperture fields.
Note for RAW files : the 'Make' and 'Model' fields are sometimes used by the camera manufacturer to store other metadata. Changing the contents of these fields might result in a corrupted RAW image. So please try this on a copy of your RAW image first. Read more here : https://sno.phy.queensu.ca/~phil/exiftool/faq.html#Q8
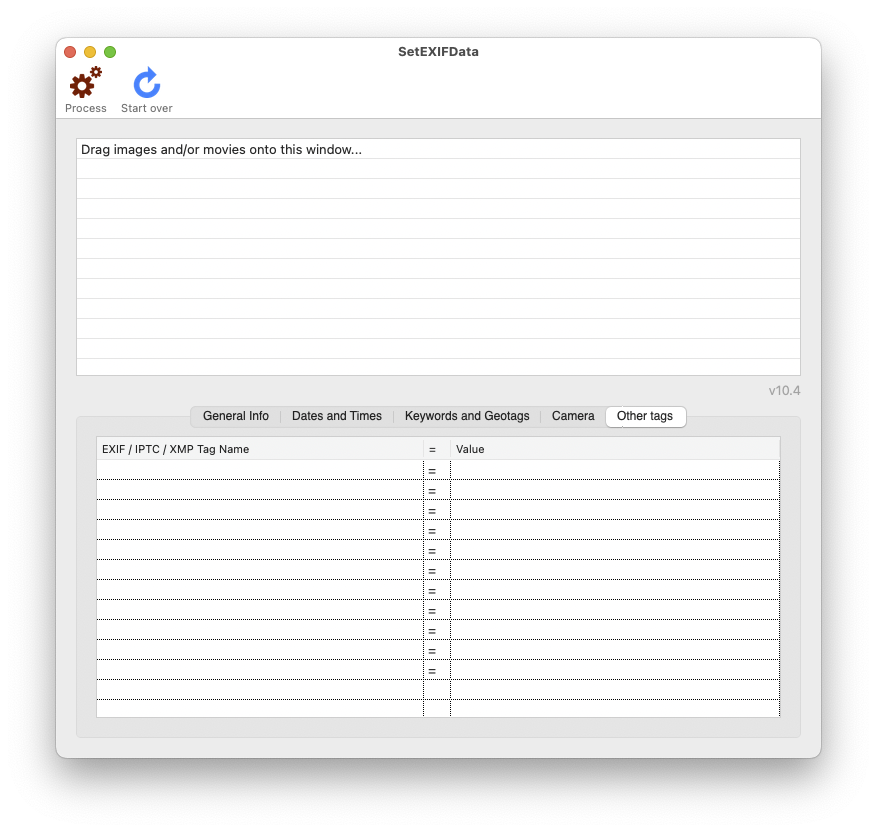
In the main window you can add other EXIF / IPTC / XMP Tags that you want set in your images a/o movies. These tags are not saved, so when you quit SetEXIFData, this settings are lost. To always add a list of tags you always use, add them via the 'Settings…' menu :
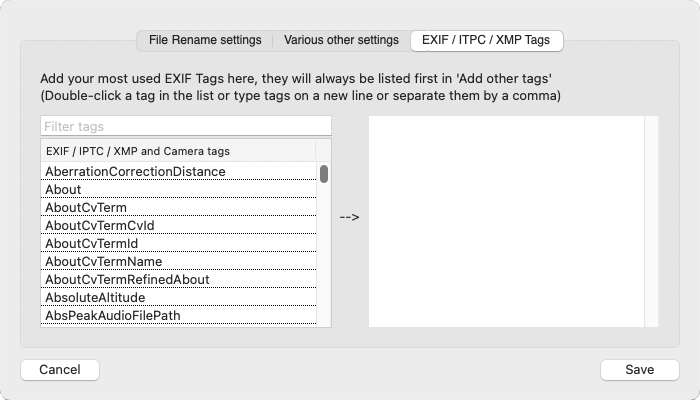
When you click 'Save', the names are tested against the list of valid, writeable exiftool tags. If a name of a tag you typed does not exist, it is prepended with a question mark and you cannot save your settings until the invalid tag is corrected or removed.
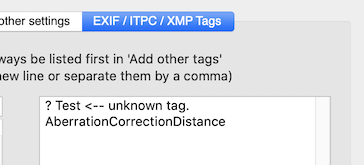
The list of tags saved here, will be loaded in the 'Add other tags'-list of the main window when SetEXIFData starts.
Main window:
Main window:
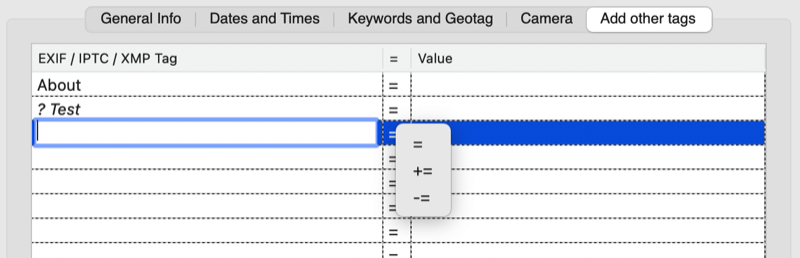
When you click on a cell and enter a tag name, the name is tested against the list of valid, writeable exiftool tags. If the name of the tag you typed does not exist, it is prepended with a question mark and will be skipped when processing starts.
For valid exiftool tags, you also have the option to: set a value (=), add a value (+=) or subtract a value (-=).
The values you enter are not tested on validity in any way; SetEXIFData does not know if a tag requires a number, float, string, or….
For valid exiftool tags, you also have the option to: set a value (=), add a value (+=) or subtract a value (-=).
The values you enter are not tested on validity in any way; SetEXIFData does not know if a tag requires a number, float, string, or….
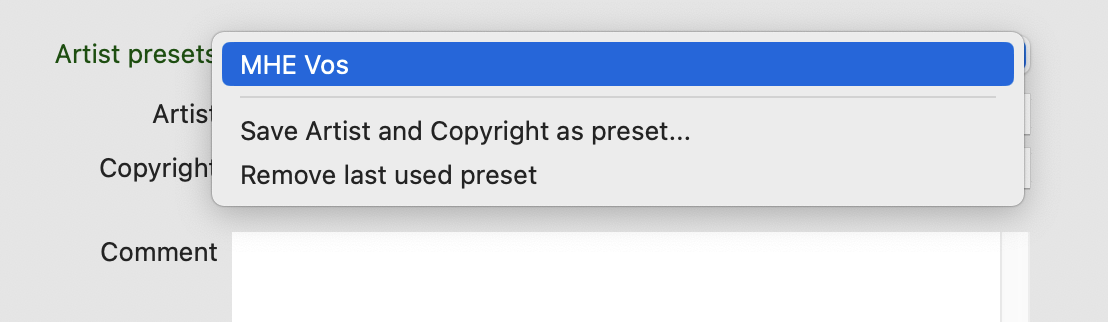
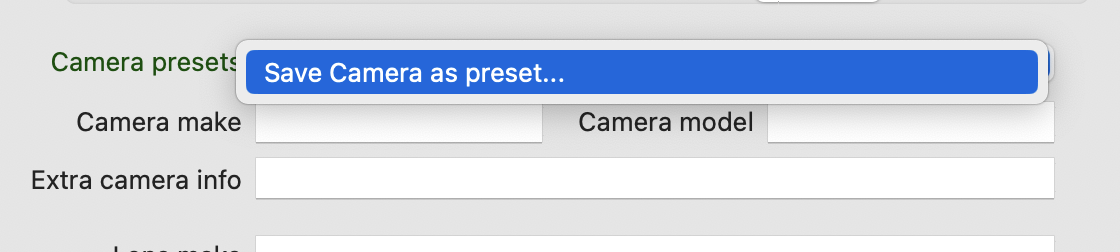
You can create presets for Artist, Keywords, Addresses and Camera settings. A preset is created by entering data first and then clicking on the popup menu, which you see above the Artist, Addresses, Keywords, Geodata and Camera fields.
Choose the 'Save XXX as preset...' menu item and you will presented a dialog window to give the preset a name and when you click OK, the current data is saved as a preset. The popup menus can look like in these examples:
Choose the 'Save XXX as preset...' menu item and you will presented a dialog window to give the preset a name and when you click OK, the current data is saved as a preset. The popup menus can look like in these examples:


Some notes
Exiftool
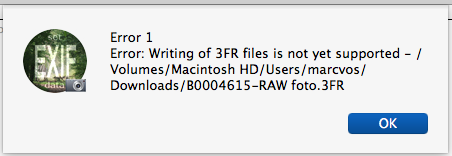
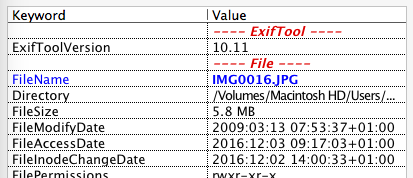
If you get an error-message like this, hen you can head over to https://exiftool.org/ and check the 'Supported File Types' table if your file type can be written to: a W should be present in column 4, 5, 6 or 7.
If that would be the case, then you can update to the latest version of EXIFtool yourself, from Phil Harvey's site.
Also, the 'Make' and 'Model' fields are sometimes used by the camera manufacturer to store other metadata. Changing the contents of these fields might result in a corrupted RAW image. So please try this on a copy of your RAW image first. Read more here : https://exiftool.org/faq.html#Q8
dcraw
When you click a line which points to a RAW image that is unsupported by macOS, SetEXIFData will use dcraw, if installed and if libraw is not installed, to extract the thumbnail image as a TIFF and use that in the preview window.
To do that, it creates the thumbnail in /tmp and prefixes the filename with sed_ so you can see where these come from.
For example, if you have a RAW image with the name IMG0023.ARW, then the thumbnail's path will be /tmp/sed_img0023.arw.tiff
When SetEXIFData quits normally, it will remove all files whose names begin with sed_ from /tmp.
Note: /tmp is a normal macOS and Unix folder, which is always completely cleared when the system is restarted.
Note: dcraw only works with macOS 10.8 or higher, also on M..-Macs as long as Rosetta is supported by Apple.
libraw
As of SetEXIFData v10, the use of libraw as a dcraw replacement is supported. libraw is dcraw's successor, and runs natively in Apple Silicon Macs.
libraw can only be installed manually, either via a complex process or the easy way: by using homebrew . If you installed homebrew, enter the following command in Terminal:: brew install libraw.
dcraw or libraw, SetEXIFData will look for libraw tools first.
libraw can only be installed manually, either via a complex process or the easy way: by using homebrew . If you installed homebrew, enter the following command in Terminal:: brew install libraw.
dcraw or libraw, SetEXIFData will look for libraw tools first.
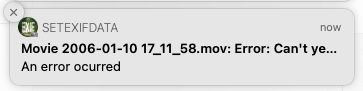
The full error message is: 'Error: Can't yet handle movie fragments when writing'
This is a thing in ExifTool itself, read more about it here: https://exiftool.org/forum/index.php?topic=10789.0
What to do? Use my tool HandbrakePM to batch convert all your fragmented movies to 'good' movie files, and then use SetEXIFData to write the EXIF data you want.
ffmpeg
As of SetEXIFData v10, the use of ffmpeg for generating movie-thumbnails is supported.
ffmpeg can only be installed manually, either via the supplied installer package or via homebrew . If you installed homebrew, enter the following command in Terminal:: brew install ffmpeg.
You can also download the latest ffmpeg from https://evermeet.cx/ffmpeg/ and copy the ffmpeg file to /usr/local/bin/.
It has been requested that I support a forward slash in file or folder names. Since I find this bad practice, I am not going to support this, because of the following reasons:
- Apple does not support a colon (:) because it is part of HFS's path separating routine.
- MacOS X's underlying motor is UNIX, which uses the forward slash (/) as a separator in paths.
- Windows does not allow even more of these kind of characters.
And since many people send photo's to friends and might not know on what OS their friends will be copying the photo to, I advise you to restrict the characters for naming folders and photos to: a-z , A-Z , - , _ , and the dot.
Tip:
Some users are using SetEXIFData to batch-rename their audio files or set the correct Finder-dates of audio-files using EXIF-data from, for example, WAV-files. If you have other audio file types, simply try if it will work.
Tip:
Some users are using SetEXIFData to batch-rename their audio files or set the correct Finder-dates of audio-files using EXIF-data from, for example, WAV-files. If you have other audio file types, simply try if it will work.
Intel 64bit
In 2020, Apple introduced the first Macs with its own Apple Silicon processors. It has an 64bit Intel converter built in, called Rosetta , so the Intel 64bit version will continue to run on Apple Silicon Macs for a while. The 64bit version will not be updated anymore. Instead, download the Universal Binary version, it contains code for both Intel and Apple Silicon.
Intel 32 bit
Since long, macOS versions are 64bit, so the 32bit version will not be updated anymore. Use the 64bit Intel version.
PPC Version
Since september 2016 there was a Universal Binary version available, for PowerPC and Intel Macs. This is per March 2017 now a PPC-only version. The version number hasn't changed and it does not check for a newer version any more.
This PPC version is not the same as the current Intel version, because it doesn't receive any new features. I use my old Powerbook G4 to keep the PPC version bug-free and when it dies, the PPC version maintenance will also stop.
Note: if you need one of the older versions, purchase a serial number for v10.x, mention the version you want, and I'll send it to you.
or